skip to main |
skip to sidebar
 There is a new book out about working with felt titled Feltique. I am excited to announce that I have contributed three tutorials to this book. I have not had a chance to see the final product yet, but judging by all the amazing artists that contributed to it, I know it will be fantastic.
 I have been working on creating a mad hatter tea party diorama with my dolls and needed a top hat, so I made one. I am posting a pattern and instructions so you can make one too. This pattern is for personal use only.
Model: Mattel Top Model Head with Volks Neo EB Body
Outfit: Mattel
Necktie & hat: me
Teapot: Rement
Materials
Scissors
Heavy card stock
Pencil
White glue
Tape
Acrylic paint
Paint brush
Ribbon
Directions
1. Cut out all three pattern pieces and trace them onto card stock. Trace and cut out two hat brims. Test out the opening hole inside the hat brim to make sure it will fit your doll’s head. I made this hat for a doll with a ponytail, so the opening for the head is a bit large.
2. Fold the pointed pieces to 90-degree angles. The pointed pieces are used to attach the parts of the hat together.
3. Curl up the wall piece of the hat and stuff it into the hole of one brim piece. Glue the ends of this piece together and tape it closed from the inside. Glue the points at the base of the hat wall to the underside of the brim. Glue this brim down to the other brim you cut out so the points will be sandwiched and hidden between two pieces of card stock.
4. Place the top on the hat, concealing the points inside the cylinder of the wall with glue.
5. Let the glue on the hat dry. Apply several coats of acrylic paint, allowing it to dry, then embellish with a ribbon hatband.

 Angry Chicken has a great how-to up for this adorable Merbaby. I have been wanting to create a mermaid doll for a while now, but have not gotten to it yet. I love this idea and think it would make the perfect gift for one of the little girls in my life.
 I have made a few small indoor water fountains in the past, but I found them to be a bit irritating rather than soothing. They splashed too much and the sound of it water made me think I had left the water on outside. So, I decided that this is an item better left outside.
I just came across this nice DIY Bubbling Water Urn over at Gardener's World. It looks really easy and fairly inexpensive to make.
 The Pioneer Woman Cooks has a tutorial up for these cute desserts that are made to look like a potted plant.
 Gardens and Crafts has a great tutorial up for making this pretty garden flower pot display.
 Pie Knits, who has some super cute knitting patterns, has just posted a tutorial for DIY upholstery. She did an amazing job re-vamping this settee. I did a similar, but smaller scale, project once and it just about killed my wrists and hands. I love the result though.
I have been brewing a lot of loose leaf teas lately. I wanted to purchase some nice canisters to hold the teas in. Everything I found in the stores was either really expensive or ugly.
I saw a bunch of tin canisters with Christmas prints in the sale bin at the craft store for less than a dollar each. So, I purchased the canisters, some pretty paper by Paper Source and Mod Podge. I covered them with the paper and now I have some nice canisters to hold tea.


 I am having a party for my birthday this weekend and wanted few table decorations. I decided not to purchase a bunch of ready-made plastic stuff that would just end up in the landfill. I chose to make paper flowers, which are also perfect for Valentine's Day. The flowers I made look like Water Lilly's. Here is how I did it:
Materials
2 colors of tissue paper
1 color of slightly thicker paper (I used a colored paper bag)
Scissors
String
 Directions
Cut four 10"x12" pieces of tissue paper and 1 layer of the thicker paper. Stack the pieces of paper up alternating the colors with the thicker piece of paper on the bottom.
Fold the paper lengthwise into 1" accordion pleats.
Trim the ends into points. Fold the folded strip in half, and cut it along the fold line. Trim these ends into points too.
Cut a notch on both sides of the middle of the shorter strip and tie with string.
Open out the pleats and begin gently lifting each layer of tissue paper. The slightly thicker paper bag paper will become the bottom of the flower.
Enjoy!
 I just stumbled across another tutorial for making felt balls with the wet felt method over at Coco Knits. She used wool scrap just like the tutorial I posted awhile back, but her balls have a Styrofoam ball center, so less wool is used. Coco Knits also has a few other great knitting tutorials too.
 When I moved in with my boyfriend last summer we both had beds, but no couch. Our loft is fairly spacious, so we decided to convert one of the bed frames into a lounge couch for the living room. This way, we have the benefits of a couch and a guest bed too.
We took the headboard off of a full sized Dalselv bed frame from Ikea and re-attached it to the long side of the bed. We marked equidistant spaces for the bars, drilled holes for them, and purchased another piece of lumber to cap the top of the headboard.
I purchased a futon cover for the mattress, and covered some giant pillows for the backrest. I used cotton fabric including a bunch of Amy Butler prints. It is so comfy that I may not ever be able to go back to a regular couch.
 I wanted to make a fun dessert for the holiday dinner. When I saw this cute Icebox Peppermint Yule Log Cake posted at Craftzine, I knew this is what I was going to make.
I could not find Peppermint extract at my grocer, so I decreased the amount of sugar and substituted Peppermint Torani syrup.I did not purchase enough whipping cream either, so my "bark" did not come out as pretty as the original. I used Droste cocoa powder in the whipped cream tasted like an outstanding chocolate ice cream.
 This holiday I made a bunch of gifts for my family members. All the women in my family received a wellness bag from me. This is what the kit included:
-eye pillow that was inspired by this project from Sew, Mama, Sew!
-soy wax jar candle, supplies from General Wax.
-a CD of meditations from the Meditation Oasis podcast.
-a bar of felted soap.

I wanted to find some type of garland to decorate my table top Christmas trees. I looked in several stores and nothing was inspiring me. I finally found what I was looking for at Michaels. It was a beaded wire with large sequins attached to it that was made for decorating gift packages. Now my dinner table is complete. Yeah!
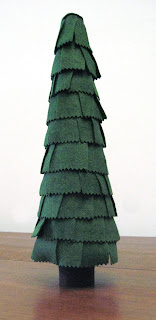 I am hosting the family holiday dinner at my house for the first time this year. I do not want to buy a tree, but feel like their needs to be some sort of décor, other than a pretty table. So, I decided to make a set of three small trees that could be arranged on a tabletop and used year after year. I still have to decorate them. I like the idea that, because they have a Styrofoam base, these trees can be re-decorated each year for a different look.
Materials Styrofoam cones
Felt fabric (I used a wool blend yardage)
Straight pins with a small head
Scissors
 Pinking shears
Cardboard tube
White glue
Craft knife
Marker
Ribbon or other decorations
Directions
Cut felt fabric into 2” wide strips.
Trim the bottom edge of the strips with the pinking shears.
Cut the strips of felt into smaller rectangular pieces.Use straight pins to attach pieces of felt onto the Styrofoam cone. Be sure to start from the bottom and work your way up, overlaping your layers as if you are putting shingles on a roof.
On the next row up, st agger the next row of felt, like you are laying down a wall of
bricks.
Trim the cardboard tube to the length you would like, and use white glue to cover it with felt fabric. This will be the trunk of the tree.
Trace the circumference of the trunk on the base of the tree.
Use a craft knife to cut a channel to fit the trunk of the tree into.
Glue the tree trunk into place.
Decorate the tree with ribbon, mini pom-poms, or whatever you desire.
You can see the trees all decorated here.
 A while back Psi-hoops came out with these amazing hoops that have LED lights in them. They are really beautiful. I wanted to purchase one, but was scared away by the $200 price tag. You can see a few videos of them in action here.
Recently, jeffkobi posted a how-to on making your own LED Hula Hoop over at instructables. He said he spent about $15 in materials. Yeah!
To learn more about the hooping phenomenon, go to hooping.org.


