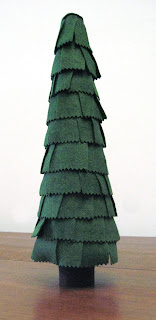
 I am hosting the family holiday dinner at my house for the first time this year. I do not want to buy a tree, but feel like their needs to be some sort of décor, other than a pretty table. So, I decided to make a set of three small trees that could be arranged on a tabletop and used year after year. I still have to decorate them. I like the idea that, because they have a Styrofoam base, these trees can be re-decorated each year for a different look.
 Materials
Styrofoam cones
Felt fabric (I used a wool blend yardage)
Straight pins with a small head
Scissors
 Pinking shears
 Cardboard tube
White glue
Craft knife
Marker
Ribbon or other decorations
Directions
Cut felt fabric into 2” wide strips.
Trim the bottom edge of the strips with the pinking shears.
Cut the strips of felt into smaller rectangular pieces.
Use straight pins to attach pieces of felt onto the Styrofoam cone. Be sure to start from the bottom and work your way up, overlaping your layers as if you are putting shingles on a roof.
On the next row up, st
 agger the next row of felt, like you are laying down a wall of
bricks.
Trim the cardboard tube to the length you would like, and use white glue to cover it with felt fabric. This will be the trunk of the tree.
Trace the circumference of the trunk on the base of the tree.
Use a craft knife to cut a channel to fit the trunk of the tree into.
Glue the tree trunk into place.
Decorate the tree with ribbon, mini pom-poms, or whatever you desire.
You can see the trees all decorated here.


3 comments:
Love this! It would be great for those little scraps of material too. Thanks!
Nice Tree! I made one with ribbon scraps- Your cardboard base is a great addition-very Christmas tree. Are they tippy?
Thanks. Yes, the can tip over. I am thinking of gluing a set of three to a base, or gluing some stones into the bottom.
Post a Comment