skip to main |
skip to sidebar
 I just stumbled across another tutorial for making felt balls with the wet felt method over at Coco Knits. She used wool scrap just like the tutorial I posted awhile back, but her balls have a Styrofoam ball center, so less wool is used. Coco Knits also has a few other great knitting tutorials too.
 When I moved in with my boyfriend last summer we both had beds, but no couch. Our loft is fairly spacious, so we decided to convert one of the bed frames into a lounge couch for the living room. This way, we have the benefits of a couch and a guest bed too.
We took the headboard off of a full sized Dalselv bed frame from Ikea and re-attached it to the long side of the bed. We marked equidistant spaces for the bars, drilled holes for them, and purchased another piece of lumber to cap the top of the headboard.
I purchased a futon cover for the mattress, and covered some giant pillows for the backrest. I used cotton fabric including a bunch of Amy Butler prints. It is so comfy that I may not ever be able to go back to a regular couch.
 I wanted to make a fun dessert for the holiday dinner. When I saw this cute Icebox Peppermint Yule Log Cake posted at Craftzine, I knew this is what I was going to make.
I could not find Peppermint extract at my grocer, so I decreased the amount of sugar and substituted Peppermint Torani syrup.I did not purchase enough whipping cream either, so my "bark" did not come out as pretty as the original. I used Droste cocoa powder in the whipped cream tasted like an outstanding chocolate ice cream.
 This holiday I made a bunch of gifts for my family members. All the women in my family received a wellness bag from me. This is what the kit included:
-eye pillow that was inspired by this project from Sew, Mama, Sew!
-soy wax jar candle, supplies from General Wax.
-a CD of meditations from the Meditation Oasis podcast.
-a bar of felted soap.
 I have just come across these adorable knit and felted mushroom patterns by Kathryn Ivy. You can see more photos of her work at her flickr page.

I wanted to find some type of garland to decorate my table top Christmas trees. I looked in several stores and nothing was inspiring me. I finally found what I was looking for at Michaels. It was a beaded wire with large sequins attached to it that was made for decorating gift packages. Now my dinner table is complete. Yeah!
I get cold hands all the time, especially when browsing on the computer. I like wearing fingerless gloves and have started hunting for a new pattern to knit up. I have already made three pairs. Two of them were patters from Interweave Knits which you can see here. While browsing I came across this great list of free patterns for knit mittens and gloves over at Knitting Pattern Central. Although they would not really help keep my hands warm, I really liked these Mushroom Pulse Warmers over at Hello Yarn. I am still searching for my perfect pattern.
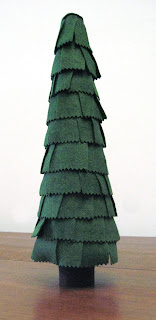 I am hosting the family holiday dinner at my house for the first time this year. I do not want to buy a tree, but feel like their needs to be some sort of décor, other than a pretty table. So, I decided to make a set of three small trees that could be arranged on a tabletop and used year after year. I still have to decorate them. I like the idea that, because they have a Styrofoam base, these trees can be re-decorated each year for a different look.
Materials Styrofoam cones
Felt fabric (I used a wool blend yardage)
Straight pins with a small head
Scissors
 Pinking shears
Cardboard tube
White glue
Craft knife
Marker
Ribbon or other decorations
Directions
Cut felt fabric into 2” wide strips.
Trim the bottom edge of the strips with the pinking shears.
Cut the strips of felt into smaller rectangular pieces.Use straight pins to attach pieces of felt onto the Styrofoam cone. Be sure to start from the bottom and work your way up, overlaping your layers as if you are putting shingles on a roof.
On the next row up, st agger the next row of felt, like you are laying down a wall of
bricks.
Trim the cardboard tube to the length you would like, and use white glue to cover it with felt fabric. This will be the trunk of the tree.
Trace the circumference of the trunk on the base of the tree.
Use a craft knife to cut a channel to fit the trunk of the tree into.
Glue the tree trunk into place.
Decorate the tree with ribbon, mini pom-poms, or whatever you desire.
You can see the trees all decorated here.


